Getting Started with the SIMS Parent App Lite – A Parents’ Guide
What do I need to register for the SIMS Parent App Lite?
Before beginning the registration processes, you will need the following:
1. Your unique registration email. Your school will send to you a registration email that contains a registration link and an invitation code. This email will be sent from Capita
SIMS (noreply@sims.co.uk). If you cannot find this email, please check your junk mail and ensure it has not been marked as SPAM.
2. The date of birth of one of your children who attends the school.
3. Either a Microsoft (including Office 365), Google, Facebook, Twitter or SIMS ID account. You can use an existing account (e.g. a Hotmail account) or create a new one
online – they are free, easy to set up and you can use any valid email address and password.
How do I Register for the SIMS Parent App Lite?
- Open your unique registration email and click the link as instructed. A new internet window will open and you will be asked to log in.
- Most users will not have a SIMS ID account and should instead register with either a Microsoft (including Office 365), Google, Facebook or Twitter account.
Click the icon for the relevant Third Party account and you will be directed to sign in using your existing details.
IMPORTANT NOTE: Before completing the registration process, you should be signed out from the chosen account you’re planning on using to register with e.g. Facebook. Alternatively, the registration process should be carried out in a private browser window.
Only users (some school staff) with an existing SIMS ID account can enter their details in the Username and Password fields that are displayed.
- You will be guided through the login process. Once logged in, you will be asked if you want to authorise SIMS Parent to use your account.
- You will now be asked for an Invitation code.
- If you were able to use click this link in the email you received, this field will be populated automatically.
- If you had to select the web address in the email, you will need to copy the invite code from the email and paste it into the space provided.
5.Enter the Date of birth of one of your children attending the school. This is for security purposes only and this information will not be used in the SIMS Parent system
6. Click the Register button to continue. NOTE: Users with multiple roles need to register only once. For example, users who are both a parent and a teacher should register as either a parent or a teacher but should not register as both. Once registered, all of the relevant parent and teacher information will be available.
How do I Download the SIMS Parent App?
The SIMS Parent app can be downloaded for free from the Apple Store (iOS) or the Play Store (Android).
How do I sign in to SIMS Parent App Lite?
Click the icon for the relevant Third Party account that you registered with e.g. Google. Enter your Sign in details
(Parents must not attempt to register using SIMS ID)
I don’t have a smart phone, how can I access the SIMS Parent App Lite?
If you have access to a tablet device, laptop, desktop computer you can sign in via the following website https://www.sims-parent.co.uk , selecting the icon for the relevant
Third Party account that you previously registered with.
The Data Collection Sheet feature
Once you have signed into the SIMS Parent App or SIMS Parent website, you will be able to see your child(ren), tap on each child to go through to the options available, in
this case Data Collection Sheet.
Click on the Data Collection Sheet to view the data which your school has requested you to add/update. Please note that they may vary from the example below, as schools will configure the app themselves.
IMPORTANT NOTE: The first Addresses and Telephone & Emails section you are able to see, underneath your child’s name are their contact details, not your contact
details. If you wish to amend the emergency contacts, including your own, scroll down the page, and you will see a Contacts section.
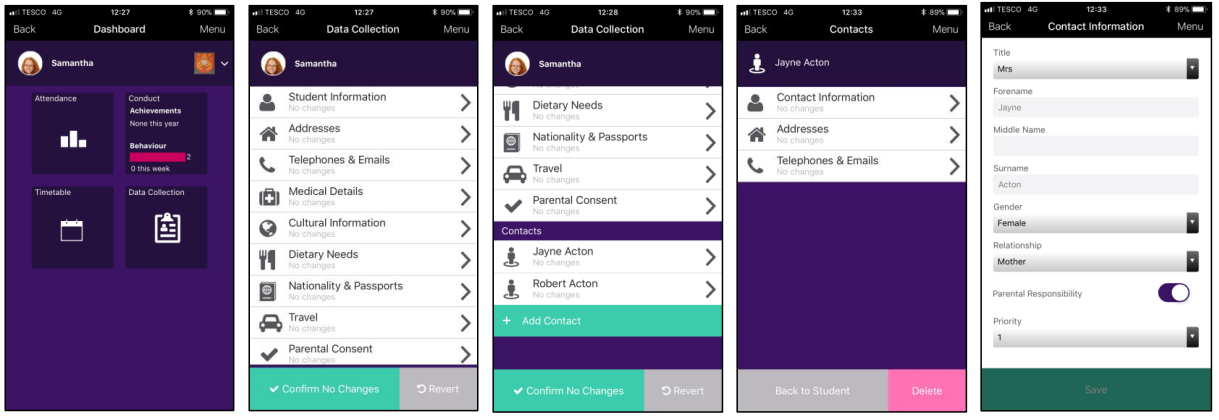
Once you have reviewed the data, if there are no changes, please ensure that you tap/click the Confirm No Changes button, as this allows the school to see when you last
reviewed the data.
How to submit changes within the Data Collection Sheet feature
If you have made an amendment to a piece of data or added some new information, you will need to tap on the Save button for each change made. You will then see a
message ‘Pending Changes’ within each section you’ve made a change in. To go back to the main Student record, either tap on the Back button (top left hand corner) or tap the Back to Student button at the bottom of the screen. Once all your amendments have been made, you must tap on the Finish Changes button (bottom of the screen).
You will then be asked to Submit Changes and will be warned that the app will become ‘Read only’ until the school have approved the changes at their end.
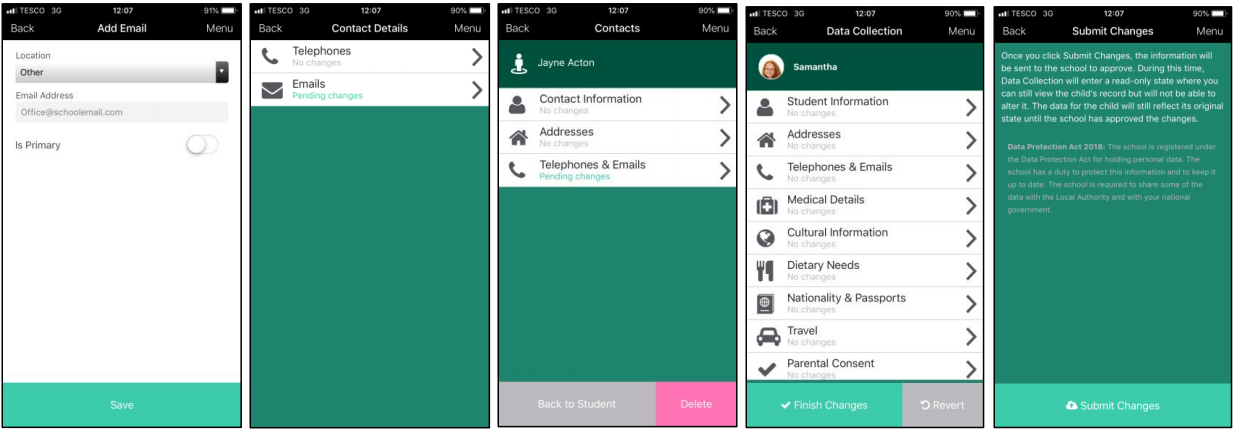
If you have submitted changes, but haven’t had them approved, the Data Collection Sheet will show with a Padlock icon, which means no further changes can be made
until the school has approved the last submission. Once they have approved the previous changes, the Padlock icon will disappear.
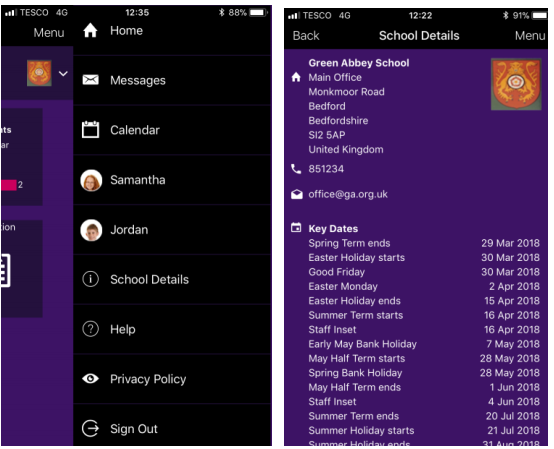
How to access the School Details screen
On the right hand top corner of the screen, there is a Menu option. If you tap/click on Menu, a list of options will be presented. If you tap on School Details, you will be
presented with the Address and Contact Details of the school, as well as useful Term Dates for the current Academic Year, including any planned Inset Days.
Click Here for SIMS Parent FAQ’s