Setting up Outlook for RM Easymail users
If a school uses the South West Grid for Learning / RM for their email provider (RM Easymail) then it is possible to link these accounts with Microsoft Outlook.
For the different versions of Microsoft Outlook please view the following connection settings and instructions on how to set this up:
Microsoft Outlook 2013
- Open Microsoft Outlook, click the File menu.
- From the Account Settings drop-down menu, select Account Settings.
- Click the E-mail tab and then click New.
- Click the Manual setup or additional server types‘ radio button and then click Next.
- Click the POP or IMAP radio button and click Next.
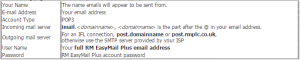
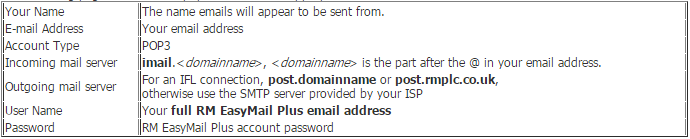
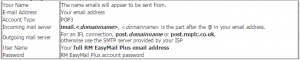
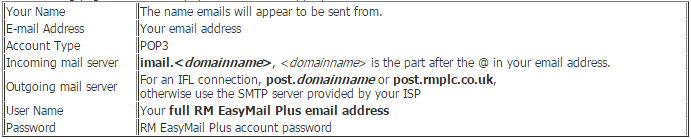
- The following page must be populated with the following information:
- Tick the Remember password box and then click More Settings.
- Click the Outgoing Server tab and tick the My Outgoing Server requires authentication box.
- Click the Use same settings as my incoming mail server radio button.
- Click the Advanced tab and in the Incoming server (POP3) field type 995.
- From the Use the following type of encrypted connection drop down menu, select SSL.
- In the Outgoing server (SMTP) field, type 587.
- From the Use the following type of encrypted connection drop down menu, select TLS.
- Follow these clicks to finish the process: OK, Next, Close, Finish, Close. This will then complete the process.
Microsoft Outlook 2010 Please note that Microsoft will cease to support Office 2010 as of October 2020.
- Open Microsoft Outlook, click the File menu, click Info and then click Account Settings.
- Select Account Settings drop-down menu.
- Click the E-mail tab and then click New.
- Click the Manual setup or additional server types‘ radio button and then click Next.
- Select the radio button for Internet E-mail and click Next.
- The following page must be populated with the following information:
- Once completed, tick the ‘Remember password’ box if required.
- Click Next, and Click Finish. Finally click Close to complete the process.
Last reviewed 07/08/2019.