External Connector – Multiple VPN Connections
In some cases it may be necessary for a central server to be connected with multiple data centres in order to obtain data from SIMS .net that will be used for Central reporting or other purposes.
The Scomis External Connector was only designed to connect to the Scomis data centre only, this means that whilst the Setup process will install everything correctly, there will inevitably be a conflict with other OpenVPN connections that may be present on the computer. The instructions below are to be used where a Schools computer needs to connect to multiple Open VPN connections.
Check if OpenVPN has been installed
OpenVPN is the software that is used to create the VPN tunnel between the schools computer and the Scomis Data Centre. Browse to C:\Program Files\OpenVPN\ to check if you have OpenVPN installed.
Check the Version of OpenVPN
Browse to the C:\Program Files\OpenVPN\Bin folder. Locate the OpenVPN.exe file, then right click and select the Properties menu. The select the Details Tab, here you will see the version numbers of OpenVPN as in the picture below;
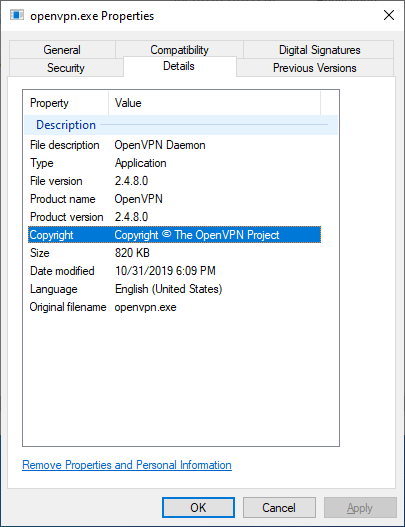
The version reported above is version 2.4.8.0, if you have this version, you will need to obtain a different configuration package, as the original Open VPN certificates will not work with this version of OpenVPN. The download page of the External Connector now contains download links for downloading the unique configuration package.
Preparing the Server for Multiple VPN Connections
Assuming the computer is already connected to another VPN Connection, you will need to check how many TAP Adaptors are assigned to the computer and add any additional adaptors if necessary, you will then need to import the configuration package, followed by updating the Windows Hosts file and then optionally installing the Scomis AutoUpdate that will keep SIMS .net up to date with the Scomis platform.
Checking TAP Adaptors
A TAP adaptor is a network interface that is used by Windows and is assigned the configuration information of the VPN Connection. Each VPN connection must have it’s own TAP Adaptor.
- Run the Network Connections control panel (Windows Key + R, they type “ncpa.cpl“)
- Count the number of TAP-Windows Adapter
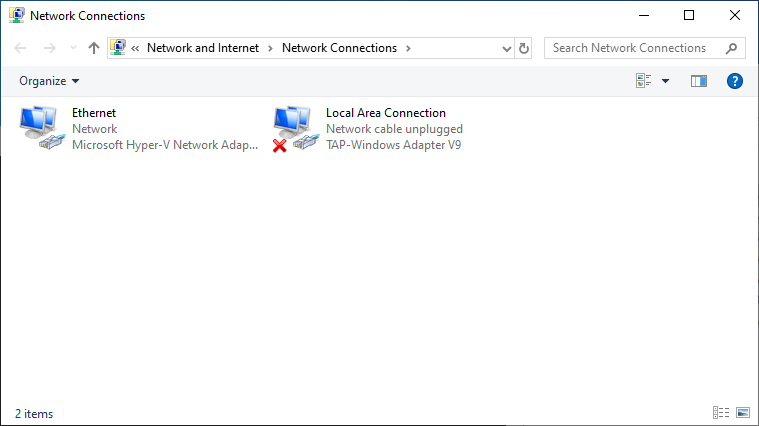
The picture above shows there is only 1 TAP Adaptor assigned to this computer. It also shows that it is not currently connected, meaning that the VPN Connection is not established.
TAP Adaptors can be easily renamed if required by selecting, then right clicking and choosing rename.
Adding an additional TAP Adaptor
- Browse to C:\Program Files\TAP-Windows\Bin
- Right click “addtap.bat” and choose “Run as Administrator”, After the UAC prompt, a command style window will be displayed showing the status of the operation. Note any errors.
- Recheck the Network Connections control panel to verify that a new TAP adaptor as been added.
Adding the Scomis Configuration Package
- Use the Downloads page from https://upgrades.scomis.org/external-connector to manually download the Configuration Package.
- Unzip the file
- Move the unzipped contents to C:\Program Files\OpenVPN\config
Applying and checking the Configuration
Applying the new VPN configuration is a simple case of restarting the OpenVPN Service from the Windows Services Management Console, and then checking the log files for any errors;
- Search the Start Menu for Services, or use Windows Key + R, then type services.msc
- Scroll down the list of Services to find OpenVPNService
- Right Click on this Service and Choose Restart from the menu
- Once the Service has restarted (assuming it started correctly), browse to C:\Program Files\OpenVPN\config
- Open the Log file “_OpenVPN-Connection.log“
- If the connection was successful, the log file should contain the message “Initialization Sequence Completed” at the end of the file.
- To Confirm a connection, open a command prompt and use IPConfig to inspect the IP Addresses assigned to the network adaptors. A Scomis VPN Connection address will typically start with 172.26.
Adding the Host Entries to the Computer
Host Entries help the computer translate the Computer name of the Scomis remote servers into an IP address, without these entries, your computer would be unable to locate the Database Servers.
- Download the file https://upgrades.scomis.org/external-connector/files/scomishosts.txt
- Open the file in Notepad and copy the contents into the clipboard.
- Open an Elevated Command Prompt – see this FAQ
- Type notepad c:\windows\system32\drivers\etc\hosts. (note that the full stop is required after the word hosts) then press Enter
- Paste the Scomis Hosts entries into the file and save.
- At the Command Prompt type PING SIMSDB01, if the name resolution is successful and the VPN connection is established, you will see a response from SIMSDB01.